How to use AlgoTest Signals to Execute your First TradingView Alert?
AlgoTest stands out as a widely recognized algorithmic trading platform in India, offering the functionality to conduct Backtests, Forward Tests, and automate trading strategies. On the other hand, TradingView is primarily recognized as a charting platform.
Within AlgoTest, users have the flexibility to design strategies based on time, momentum, and range breakouts. In order to support indicator based strategies, AlgoTest has launched a new feature called Signals. Signals enables traders to automate their TradingView indicator-based strategies within the AlgoTest environment.
In this article, we will guide you through the process of creating a SuperTrend based trading strategy on TradingView and subsequently automating it using AlgoTest.
What's Required to Link TradingView and AlgoTest?
- To establish a connection between TradingView and AlgoTest, there are a few prerequisites: A minimum requirement is to possess the “Essential plan” on TradingView. You can acquire this plan by navigating to your profile section on TradingView.
- Additionally, you will need a Signal Bridge plan from AlgoTest, which is available at a cost of approximately 799 credits. You can purchase this plan through your profile section on AlgoTest. Also view AlgoTest pricing here.
Connecting Your TradingView Strategy with AlgoTest Made Easy:
This process is very easy and straightforward. I'll guide you through it step by step with accompanying images to ensure a seamless connection. To link your TradingView Supertrend Strategy with AlgoTest, we'll start by adding the Supertrend indicator on TradingView. Afterwards, we'll create a basic call buy and put buy leg strategy in AlgoTest. Finally, we'll merge these components using AlgoTest's SIGNAL feature.
Step-by-Step Guide to Linking Your TradingView Strategy with AlgoTest
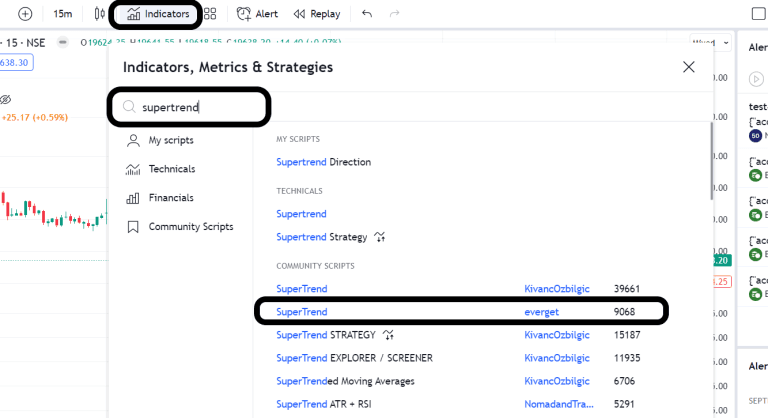
- To begin, navigate to TradingView and open the index chart you wish to trade. For this example, I'm using a 5-minute Nifty chart. Next, we need to add the SuperTrend indicator to the Nifty chart. Locate the SuperTrend indicator in the indicator section, and choose the SuperTrend indicator by Everget, as illustrated in the image below.
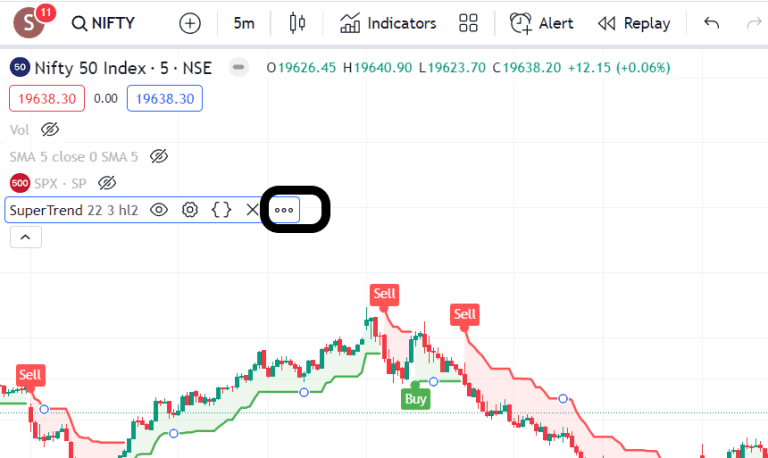
Click on the three dots located on the SuperTrend indicator, as demonstrated in the image above. Then, select 'Add Alert on SuperTrend' (This step involves creating an alert that we will later link to AlgoTest). This action will open a new pop-up that resembles the image depicted below.
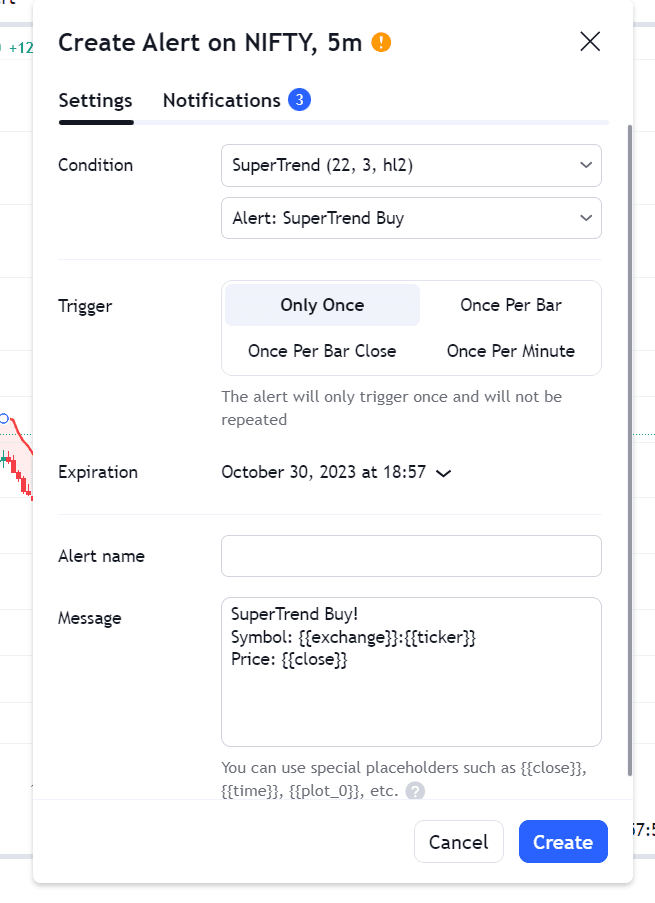
Next, we need to configure the conditions for Entry and Exit within the Condition Field.
Here's the strategy:
Entry: Buy an ATM Put when the Supertrend indicates a Sell Signal.
Exit: Close our ATM Put Buy position if Nifty displays a Buy Signal.
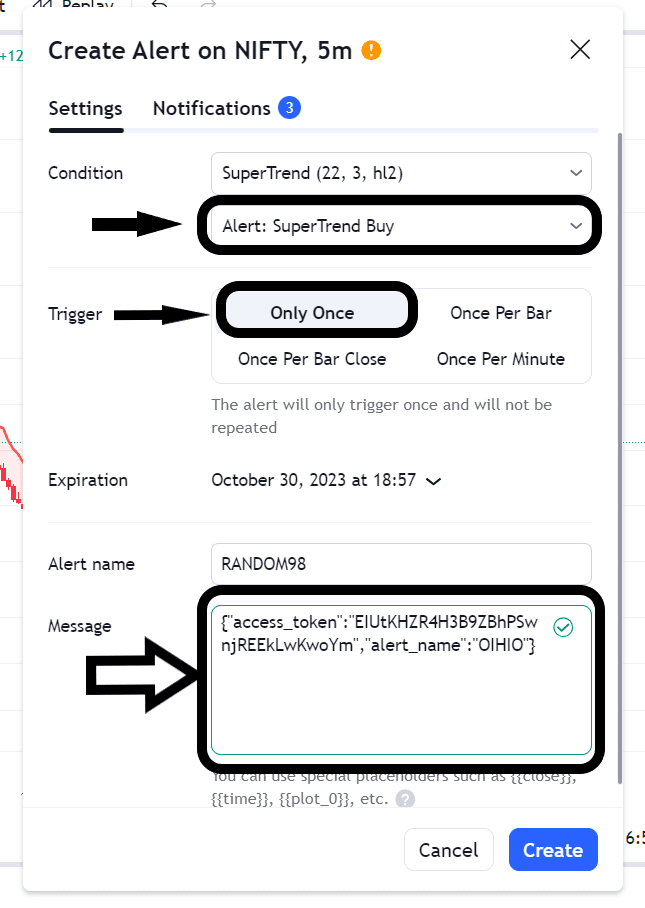
First, let's establish our Entry Condition. Set up the condition field as depicted in the image below.
Having configured the conditions as shown in the image above, the next step is to choose the trigger condition. You have four options:
- Only Once: Selecting this option means that your entry will trigger just once. It will take only one entry. For instance, if the conditions are met for the first entry, and then the conditions are met again, it won't trigger another entry.
- Once Per Bar: Opting for this means that it will initiate an entry every time the entry conditions are met, but not more than once per bar. For example, within a 5-minute candle, even if the conditions trigger twice, only one entry will be made. However, in the next candle, if the entry conditions are satisfied, a new entry will be triggered.
- Once Per Bar Close: If you select this, it will check your entry condition at the close of each 5-minute candle and initiate an entry every time it's satisfied.
- Once Per Minute: Choosing this option means it will make an entry each time the entry conditions are met but will not allow more than one entry in a single minute. For instance, if two entry triggers occur within one minute, it will only take one entry. However, in the next minute, if the entry conditions are met, it will trigger a new entry.
For our specific case, where we want only one entry, we will select 'Only Once.' This selection will result in your settings appearing as depicted in the image below.
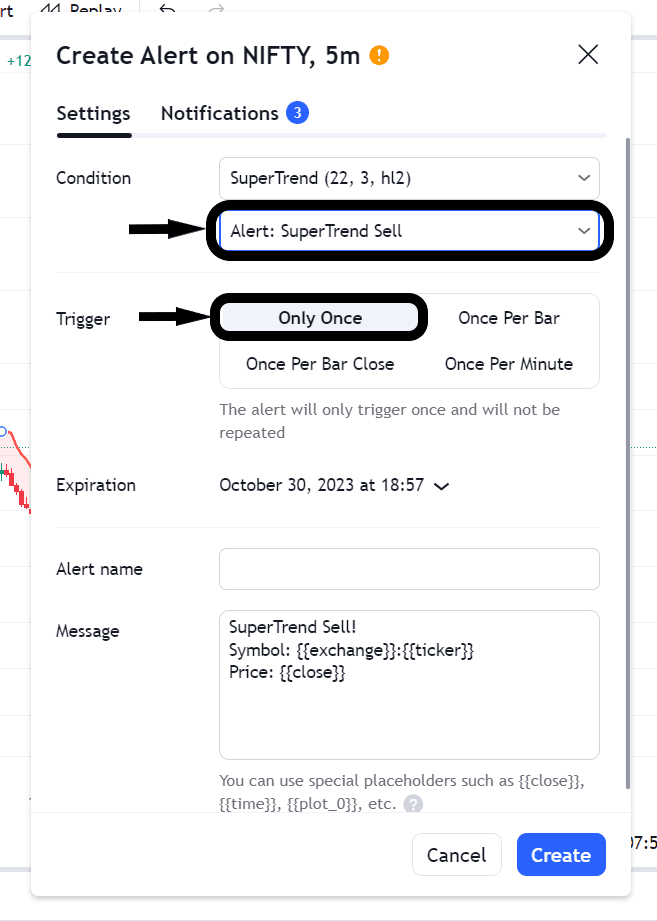
Now, having configured your settings as depicted in the image above, refrain from making any further adjustments. Our next step involves creating an ATM Put option buy leg strategy in AlgoTest and linking it to the alert we've set up. Do not interact with the alert field tab above; simply leave it as is, and avoid clicking anywhere within this tab.
- Next, open a new browser tab. In this new tab, visit the AlgoTest website at https://algotest.in and proceed to log in.
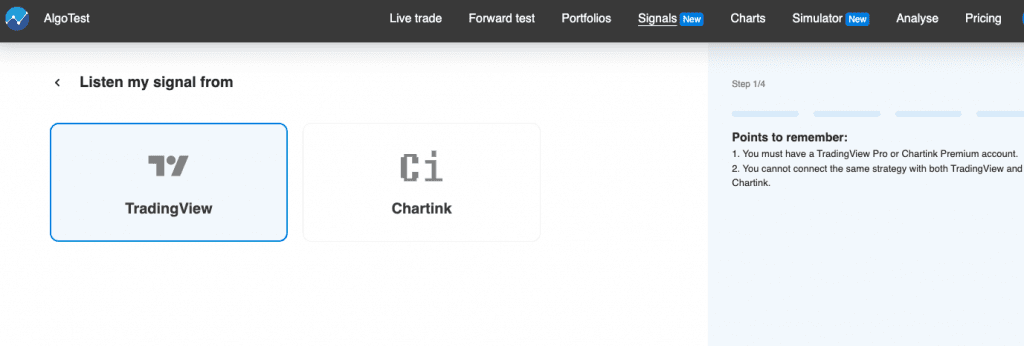
- Once logged in, locate and click on the 'Signals' feature in AlgoTest, following the example provided in the image below.

Select 'New Signal' and opt for the 'Trading View' option.
- Now, you'll be presented with two choices:
- 'Live Deployment'
- 'Forward Test'
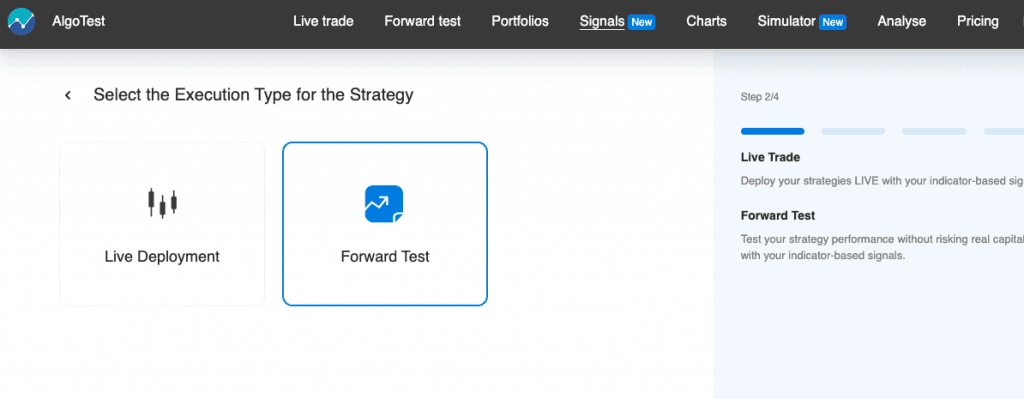
- If you intend to implement this strategy in a live trading environment, click on 'Live Deployment.' If you prefer to paper trade the strategy initially, click on 'Forward Test.' My recommendation is to deploy the strategy in a forward test first to ensure it accurately executes the entries based on the conditions we've set. Please note that the steps for connecting both live and forward trading are identical.
Traders can select their existing strategies created or can create new strategies from starting
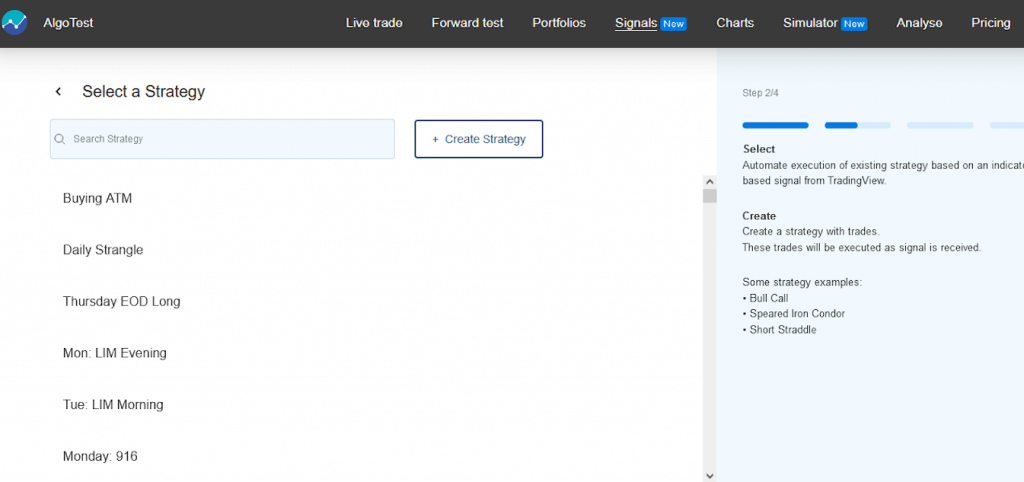
Click on 'Create Strategy' and proceed to add only one 'Put Buy' leg to the strategy, as demonstrated in the image below. In this case, we are crafting an ATM buy leg strategy.
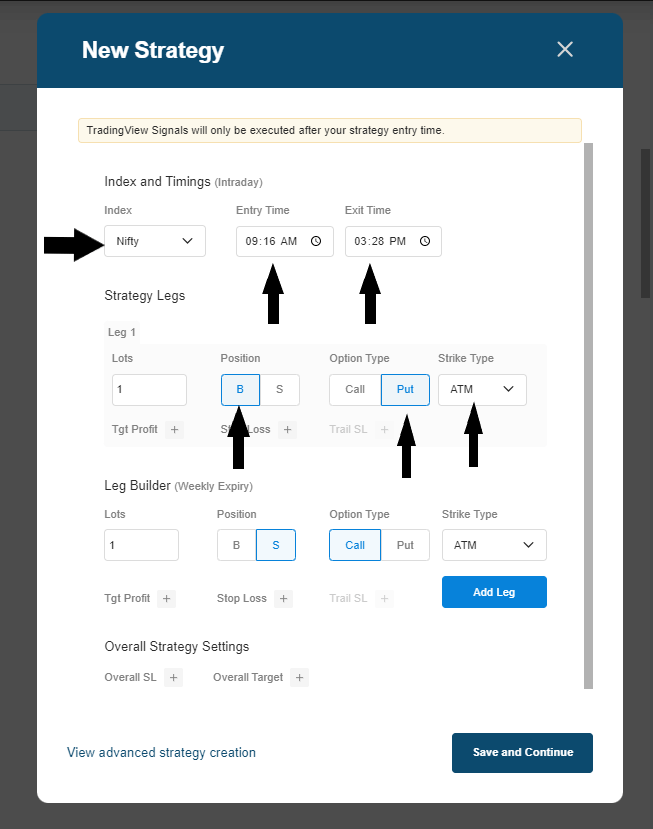
Configure your strategy as demonstrated in the image above, making adjustments as needed to suit your specific requirements. In this strategy, we've included an ATM Put Buy leg.
Key Strategy Details:
- Index: Nifty
- Entry Time: 9:16 (This signifies that our strategy will begin receiving alerts from TradingView only after the specified entry time, in this case, 9:16. Please note that this time does not indicate execution at 9:16.)
- Exit Time: 3:28 (This indicates that our strategy will cease to receive alerts from TradingView after 3:28. Any alerts generated after this time will not trigger entry. The strategy will only respond to alerts generated by TradingView until 3:28.)
We haven't added a stop-loss within the strategy due to the presence of an exit condition. However, you have the option to include one if desired.
Now, proceed to 'Save and Continue,' and assign a name to your strategy. If prompted for execution settings, I'll provide you with recommended settings for optimal execution. However, for a more detailed understanding of execution settings and their functionality, you can [click here](insert link to further explanation). If you prefer not to delve into the details, you can simply follow the settings below:
- Product Type: NRML
- Order Type: Limit
- Limit Buffer: 5 Points
After configuring these settings, click on 'Setup & Save These Settings.' You can enter the entry alert name as 'Test' (or any name of your choice). Now, copy the JSON Block code using the copy icon, as illustrated in the image below.
After copying the code, return to the TradingView tab (the Alert Tab that was left untouched) and paste the code into the Message box, which is indicated by a black arrow, as illustrated in the image below.
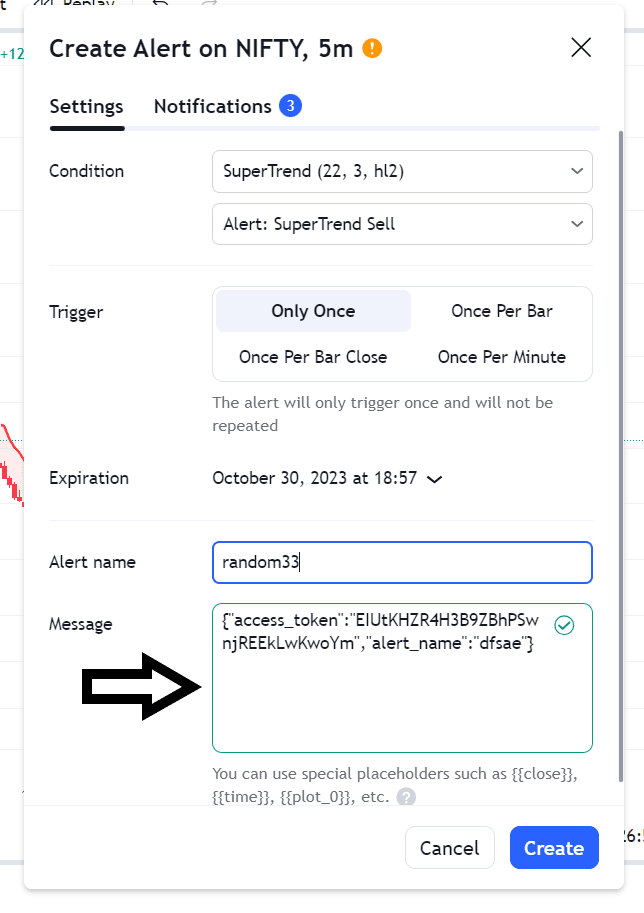
- Enter a custom name in the 'Alert Name' field, and choose any expiration date for the alert's validity. Afterward, click on 'Notifications,' as indicated in the red-marked area in the previous image.
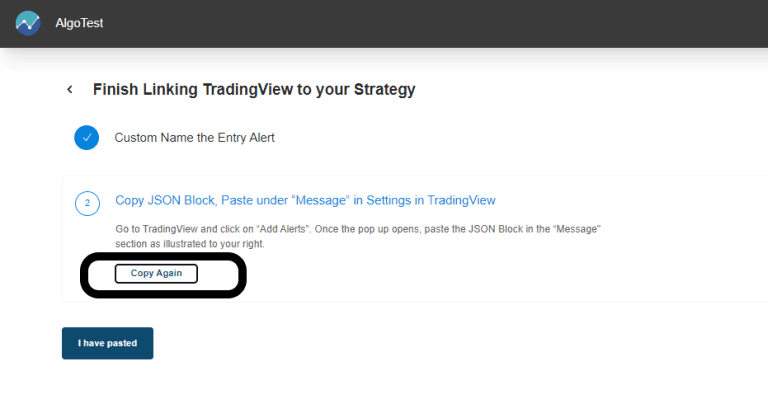
- Now, switch over to the AlgoTest tab and select 'I have pasted.' This will display the webhook URL along with a 'Copy' button. Click on 'Copy,' as demonstrated in the image below. You'll need to paste this webhook URL in the 'Notification' tab we accessed in the previous step.
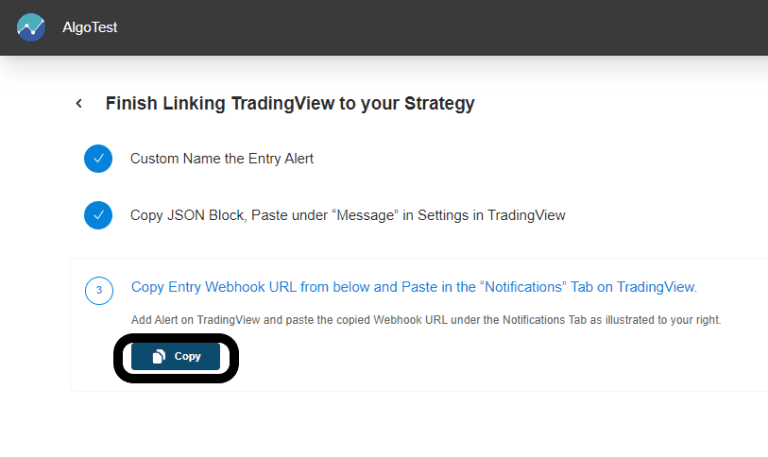
Next, paste the copied Webhook URL into the 'Webhook URL' field within the 'Notification' tab, just as depicted in the image below. If the Webhook URL is already populated, make sure to clear it first before pasting the copied URL.
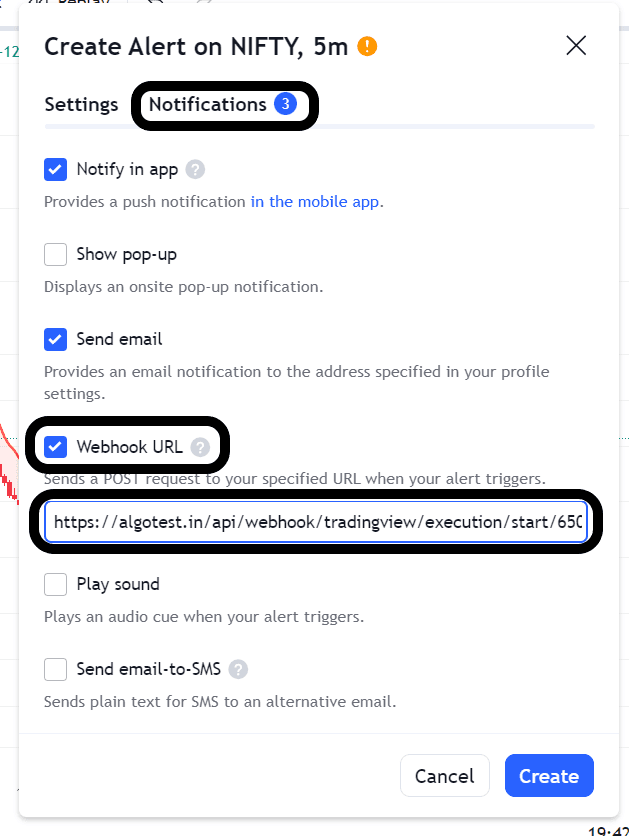
Click on 'Create' now. With this step, our TradingView Entry alert has been successfully created. The next task is to set up an exit alert. To do this, return to the AlgoTest tab, and you will find an option for creating an exit alert (this is optional), as illustrated in the image below.

- Select 'Add Exit Alert,' as illustrated in the image above.
- Provide it with a unique name and save the alert configuration.
- You will then see a JSON block message. Copy this message. (Now, we need to create an exit alert in TradingView for the Support Line, just as we did at the beginning. However, this time it's for the exit, so the conditions will be different.)
- Return to the TradingView tab.
- Click on 'Indicator' (represented by three dots).
- Choose 'Add Alert.'
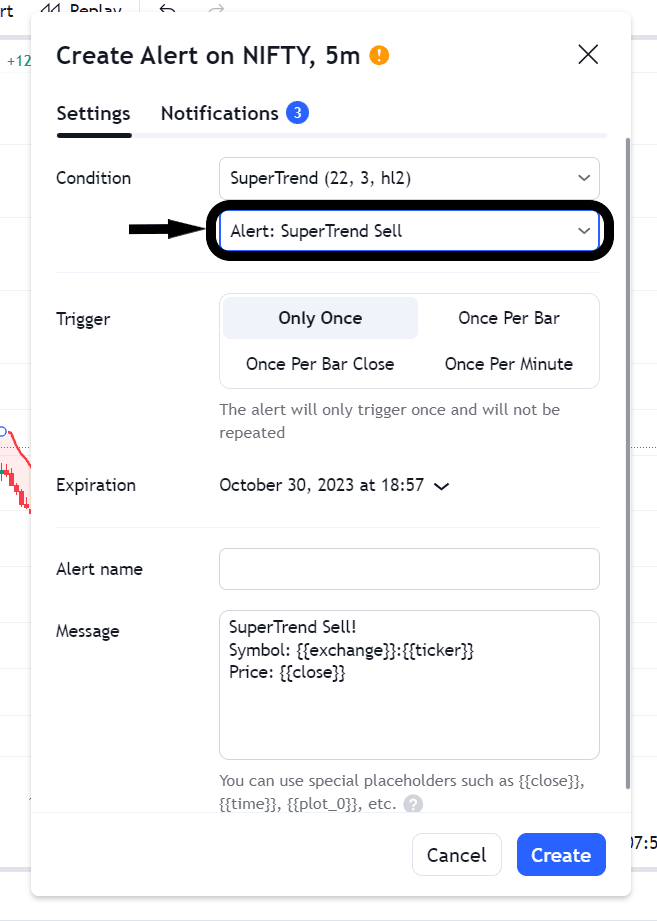
Recall that our entry condition was based on the SuperTrend providing a sell signal, triggering the purchase of an ATM put. For our exit condition, we want to exit the put buy position when the SuperTrend generates a buy signal. Configure the alert settings as demonstrated in the image below.
- Insert the JSON code we copied into the message box, following the example in the image.
- Next, click on 'Notification.'
- Switch to the AlgoTest tab, and select 'I have pasted.'
- Now, copy the exit webhook URL from AlgoTest, and paste it into the 'Webhook URL' option within the notification tab, similar to what we did when creating the entry alert.
- Click on 'Create Alert.'
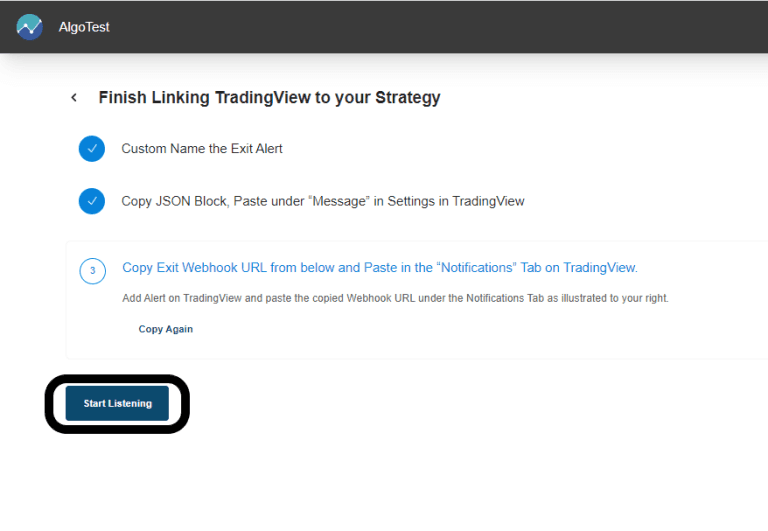
- Finally, return to the AlgoTest tab and click on 'Start Listening,' as indicated by the black marker in the image below.
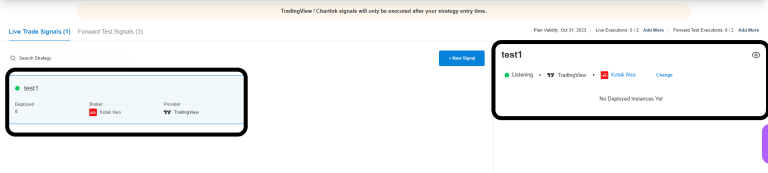
If all the steps have been executed correctly, your strategy will display a 'listening' status within the SIGNAL tab in AlgoTest, as depicted in the image below.
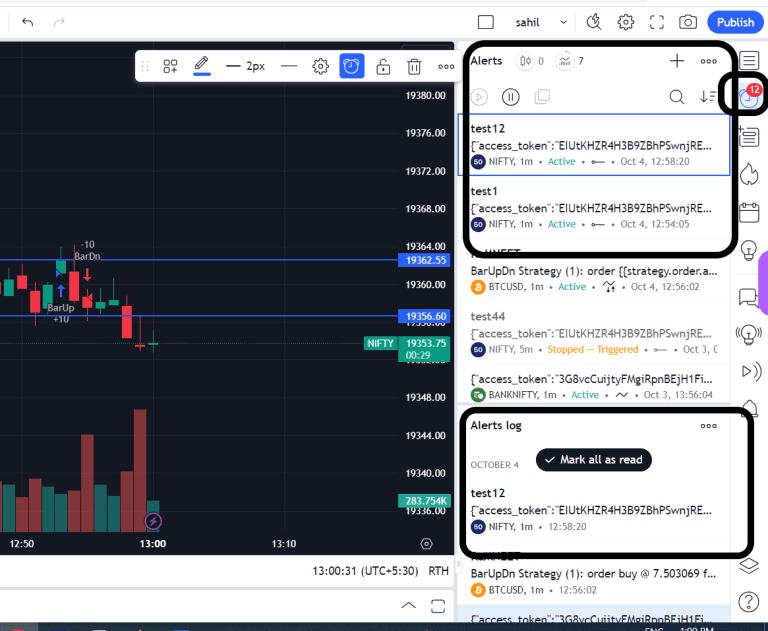
To view your active alerts and generated alerts, you can review the alert section in TradingView, as illustrated in the image below.
Now, with the 'listening' status indicating that our strategy is active, it's ready to respond to any alerts triggered in TradingView based on the SuperTrend. It will automatically execute both entry and exit actions in AlgoTest.
Following a similar process, you can also create a new entry alert based on a SuperTrend buy signal and establish a call buy strategy in AlgoTest. The steps for connecting them are the same as we've previously outlined.
It's important to note that you can't combine both calls and put buy legs within a single strategy. Just as we created an alert for the SuperTrend sell signal and connected it with a put buy strategy, you can similarly create an alert for a SuperTrend buy signal and link it with a call buy strategy.
On AlgoTest, you can also do paper trading (Forward Testing with virtual capital). To learn the process of paper trading view with TradingView, give a read to this article.